| 일 | 월 | 화 | 수 | 목 | 금 | 토 |
|---|---|---|---|---|---|---|
| 1 | ||||||
| 2 | 3 | 4 | 5 | 6 | 7 | 8 |
| 9 | 10 | 11 | 12 | 13 | 14 | 15 |
| 16 | 17 | 18 | 19 | 20 | 21 | 22 |
| 23 | 24 | 25 | 26 | 27 | 28 | 29 |
| 30 |
- 수명주기
- edwith
- 안드로이드 스튜디오
- RecyclerView
- SceneDelegate
- 자바
- 부스트코스
- 코드리뷰
- 스낵바
- 액션바
- 제약 레이아웃
- 뷰
- IOS
- 상대 레이아웃
- 아이폰
- 드로어블
- 텍스트뷰 자동 스크롤
- 안드로이드_프로그래밍
- 데이터베이스
- 프로젝트
- 안드로이드
- 리니어 레이아웃
- 프로그래밍
- 테이블_레이아웃
- 텍스트뷰 스크롤
- 코틀린
- 서비스
- Swift
- 레이아웃
- textview auto scroll
- Today
- Total
듀다의 성장개발로그
iOS) RxDataSources로 테이블뷰 내용 변경하기 본문
우리가 앱을 사용할 때, 같은 UI지만 다른 데이터소스에서 데이터를 받아 표시해야 하는 경우가 생길 수 있습니다.
수강신청 정보 앱을 예로 들면, 교양 과목 조회 화면에서 현재 표시된 것과 다른 영역의 교양 과목 정보를 보고자 할 때,
DB의 다른 조회 결과를 가지고 표시를 해주어야겠죠?
다른 데이터소스를 받아오기 위해, 그리고 테이블뷰의 내용을 좀 더 쉽게 변경하기 위해 지난 시간의 예제를 RxDataSources를 써서 수정해보도록 하겠습니다.
pod 'RxDataSources'우선 RxDataSources를 설치해야 합니다.

테이블뷰의 내용을 변경할 수 있게 하려면 유저가 누를 버튼이 있어야겠죠?
Main.storyboard에서 테이블뷰 아래에 버튼을 하나 만들어 줍니다.
import Foundation
import RxDataSources

struct RestaurantSection {

    var header: String
    var items: [Restaurant]
}

extension RestaurantSection: AnimatableSectionModelType {
    typealias Item = Restaurant

    var identity: String {
        return header
    }

    init(original: RestaurantSection, items: [Restaurant]) {
        self = original
        self.items = items
    }
}
그리고 저는 기존의 RestaurantsViewModel 대신 사용할 RestaurantSection이라는 파일을 만들었습니다.
RxDataSources를 사용할 오브젝트이기 때문에 AnimatableSectionModelType을 상속합니다.
이는 Section을 가진 타입이며, Restaurant 객체 한 개가 아닌 Restaurant의 배열을 받아서 처리합니다.
import Foundation
import RxDataSources

struct Restaurant: Decodable, IdentifiableType, Equatable {
    var identity: String {
        return name
    }

    let name: String
    let cuisine: Cuisine
}

enum Cuisine: String, Decodable {
    case european
    case indian
    case mexican
    case french
    case english
}
AnimatableSectionModelType에서 사용하기 위해 Restaurant에도 IdentifiableType과 Equatable을 추가하고, identify라는 변수도 넣어 줍니다.
import RxCocoa그리고 RestaurantSevice.swift를 수정해보겠습니다. RxCocoa를 import시킵니다.
protocol RestaurantServiceProtocol {
    func fetchRestaurants() -> Observable<[Restaurant]>
    func mutableRestaurants() -> BehaviorRelay<[RestaurantSection]>
}
Observable이 아닌 BehaviorRelay를 반환하는 함수도 만들어 주어야 합니다. BehaviorRelay를 반환하는 함수 mutableRestaurants()를 작성하기 위해, RestaurantServiceProtocol에 위 코드를 먼저 추가해줍니다.
    func mutableRestaurants() -> BehaviorRelay<[RestaurantSection]> {
        let subject: BehaviorRelay<[RestaurantSection]> = BehaviorRelay(value: [])

        guard let path = Bundle.main.path(forResource: "restaurants", ofType: "json") else {
            return subject
        }
        do {
            let data = try Data(contentsOf: URL(fileURLWithPath: path), options: .mappedIfSafe)
            let restaurant = try JSONDecoder().decode([Restaurant].self, from: data)
            let branch = [RestaurantSection(header: "New branch", items: restaurant)]
            subject.accept(branch)
        } catch(let error) {
            print(error)
        }

        return subject
    }
식당 정보를 받아오는 방식은 기존과 같이 구현합니다. 단, BehaviorRelay 변수를 하나 선언해, 여기에서 accept를 호출하고, 반환도 이 변수를 통해 처리합니다. accept의 역할은 BehaviorRelay에 데이터를 넣어 주는 것입니다. Observable의 onNext와 유사합니다.
import Foundation
import RxSwift
import RxCocoa

protocol RestaurantServiceProtocol {
    func fetchRestaurants() -> Observable<[Restaurant]>
    func mutableRestaurants() -> BehaviorRelay<[RestaurantSection]>
}

class RestaurantService: RestaurantServiceProtocol {

    func fetchRestaurants() -> Observable<[Restaurant]> {

        return Observable.create { observer -> Disposable in

            guard let path = Bundle.main.path(forResource: "restaurants", ofType: "json") else {
                return Disposables.create {  }
            }
            do {
                let data = try Data(contentsOf: URL(fileURLWithPath: path), options: .mappedIfSafe)
                let restaurant = try JSONDecoder().decode([Restaurant].self, from: data)
                observer.onNext(restaurant)
            } catch(let error) {
                observer.onError(error)
            }
            return Disposables.create { }
        }
    }

    func mutableRestaurants() -> BehaviorRelay<[RestaurantSection]> {
        let subject: BehaviorRelay<[RestaurantSection]> = BehaviorRelay(value: [])

        guard let path = Bundle.main.path(forResource: "restaurants", ofType: "json") else {
            return subject
        }
        do {
            let data = try Data(contentsOf: URL(fileURLWithPath: path), options: .mappedIfSafe)
            let restaurant = try JSONDecoder().decode([Restaurant].self, from: data)
            let branch = [RestaurantSection(header: "New branch", items: restaurant)]
            subject.accept(branch)
        } catch(let error) {
            print(error)
        }

        return subject
    }
}
RestaurantService.swift 전체 코드
    private let subject: BehaviorRelay<[RestaurantSection]>

    func mutableRestaurantViewModels() -> BehaviorRelay<[RestaurantSection]> {
        return subject
    }

    func refresh(newBranch: [RestaurantSection]) {
        subject.accept(newBranch)
    }
RestaurantsListViewModel.swift에도 BehaviorRelay<[Restaurant]>인 변수와, 이 변수를 반환하는 메소드를 만들어 줍니다.
import Foundation
import RxSwift
import RxCocoa

final class RestaurantsListViewModel {
    let title = "Restaurants"

    private let restaurantService: RestaurantServiceProtocol
    private let subject: BehaviorRelay<[RestaurantSection]>

    init(restaurantService: RestaurantServiceProtocol = RestaurantService()) {
        self.restaurantService = restaurantService
        self.subject = restaurantService.mutableRestaurants()
    }

    func fetchRestaurantViewModels() -> Observable<[RestaurantViewModel]> {
        restaurantService.fetchRestaurants().map { $0.map { RestaurantViewModel(restaurant: $0)}}
    }

    func mutableRestaurantViewModels() -> BehaviorRelay<[RestaurantSection]> {
        return subject
    }

    func refresh(newBranch: [RestaurantSection]) {
        subject.accept(newBranch)
    }
}
RestaurantsListViewModel.swift 전체 코드
    @IBAction func refresh(_ sender: UIButton) {
        let ress: [Restaurant] = [
            Restaurant(name: "Curry Generation", cuisine: Cuisine(rawValue: "indian")!),
            Restaurant(name: "Burritopia", cuisine: Cuisine(rawValue: "mexican")!)
        ]
        let Bsection: [RestaurantSection] = [
            RestaurantSection(header: "B section", items: ress)
        ]
        viewModel.refresh(newBranch: Bsection)
    }
ViewController.swift에서는 터치하는(touch up inside) 액션을 다룰 IBOutlet을 추가하고 그 안에서, BehaviorRelay를 adapt하는 함수 refresh를 호출합니다.
        let dataSource = RxTableViewSectionedReloadDataSource<RestaurantSection>(
            configureCell: { dataSource, tableView, indexPath, item in
                let cell = tableView.dequeueReusableCell(withIdentifier: "cell", for: indexPath)
                cell.selectionStyle = .none
                cell.textLabel?.text = item.name + " - " + item.cuisine.rawValue.capitalized

                return cell
            })
        self.d_source = dataSource
        tableView.rx.setDelegate(self)
            .disposed(by: disposeBag)

        viewModel.mutableRestaurantViewModels()
            .bind(to: tableView.rx.items(dataSource: d_source))
            .disposed(by: disposeBag)
테이블뷰의 내용은 viewDidLoad 안에서 위와 같이 설정합니다. 셀의 내용을 설정하고 Delegate를 수행한 뒤, BehaviorRelay의 bind까지 해주었습니다.
import UIKit
import RxSwift
import RxCocoa
import RxDataSources

class ViewController: UIViewController, UITableViewDelegate {

    var d_source: RxTableViewSectionedReloadDataSource<RestaurantSection>!
    let disposeBag = DisposeBag()
    private var viewModel: RestaurantsListViewModel!

    @IBOutlet weak var tableView: UITableView!

    @IBAction func refresh(_ sender: UIButton) {
        let ress: [Restaurant] = [
            Restaurant(name: "Curry Generation", cuisine: Cuisine(rawValue: "indian")!),
            Restaurant(name: "Burritopia", cuisine: Cuisine(rawValue: "mexican")!)
        ]
        let Bsection: [RestaurantSection] = [
            RestaurantSection(header: "B section", items: ress)
        ]
        viewModel.refresh(newBranch: Bsection)
    }

    override func viewDidLoad() {
        super.viewDidLoad()
        self.viewModel = RestaurantsListViewModel()
        tableView.tableFooterView = UIView()

        navigationItem.title = viewModel.title
        navigationController?.navigationBar.prefersLargeTitles = true
        tableView.contentInsetAdjustmentBehavior = .never

        let dataSource = RxTableViewSectionedReloadDataSource<RestaurantSection>(
            configureCell: { dataSource, tableView, indexPath, item in
                let cell = tableView.dequeueReusableCell(withIdentifier: "cell", for: indexPath)
                cell.selectionStyle = .none
                cell.textLabel?.text = item.name + " - " + item.cuisine.rawValue.capitalized

                return cell
            })
        self.d_source = dataSource
        tableView.rx.setDelegate(self)
            .disposed(by: disposeBag)

        viewModel.mutableRestaurantViewModels()
            .bind(to: tableView.rx.items(dataSource: d_source))
            .disposed(by: disposeBag)
  }
}
ViewController.swift 전체 코드


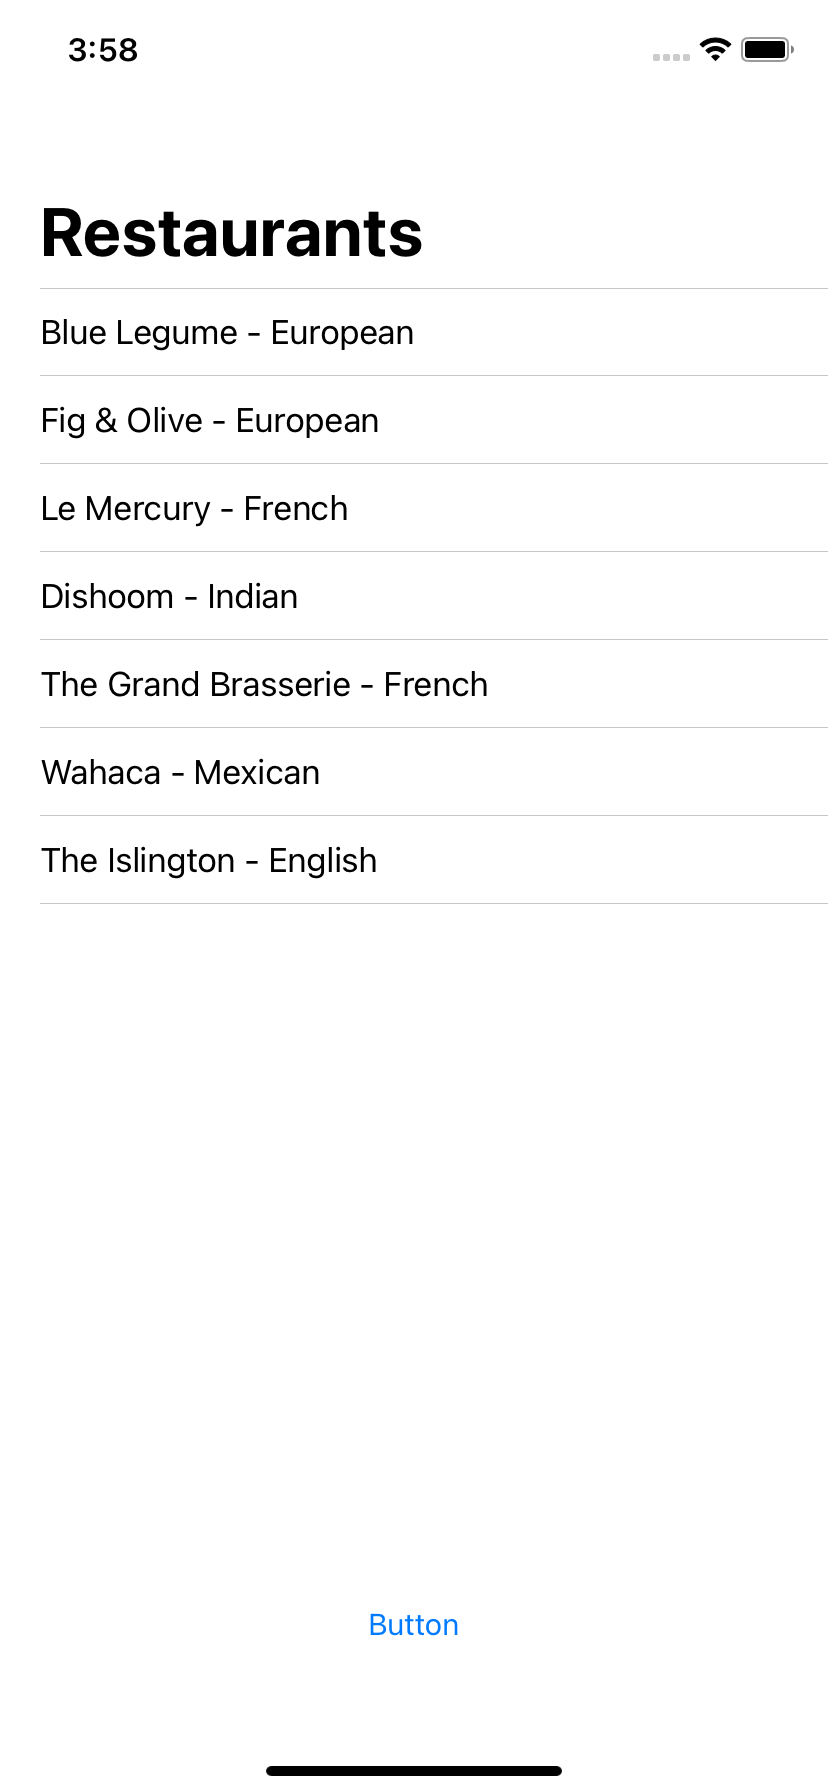
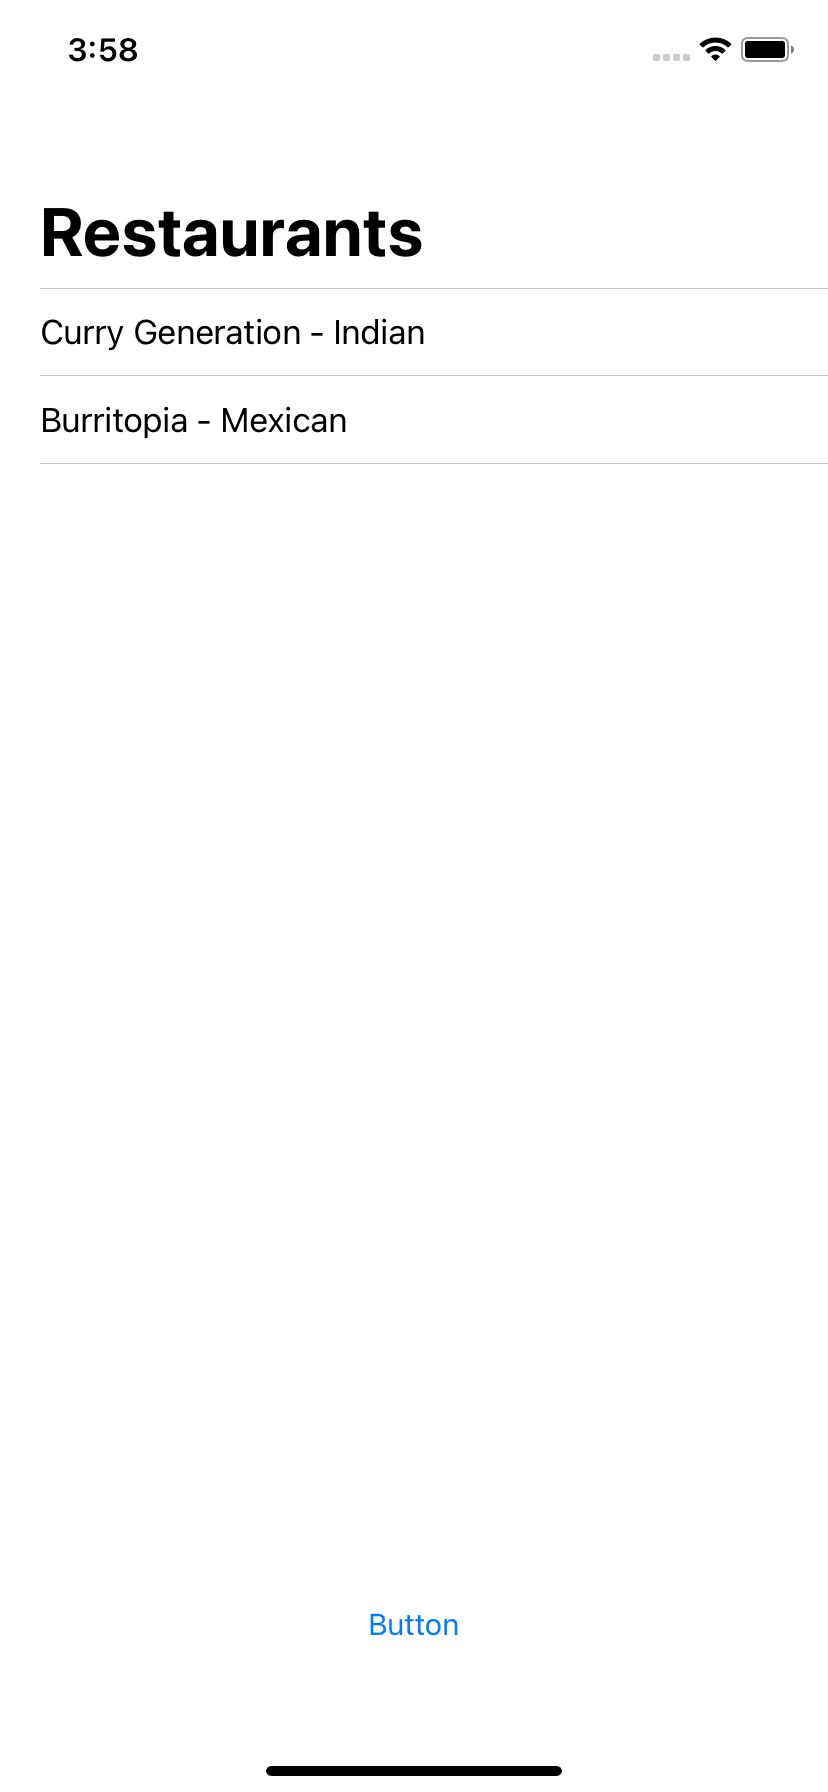
이제 앱을 실행하고 아래 버튼을 누르면 테이블뷰의 내용이 다른 소스로부터 변경되는 것을 보실 수 있습니다.
참고 링크:
www.youtube.com/watch?v=PAHqiqb5CxM&list=PLLvVbXNzMjktXQKfgVv3L_iyRWINJ8cKr&index=2
